dotnet mvc on Oracle ACCS

In this article, I’m going to briefly walk through how to create and deploy a .net mvc sample app in Oracle Application Container Cloud Service.

Assumptions:

  • you have an Oracle Cloud account, it can be the promotion trial account
  • you have dotnet core installed on your local machine – I’m using dotnet 2.0.0 on MacOS
  • you have the corresponding editor / tools, e.g. I’m using VS Code.
  1. Launch VS Code and open the embedded Terminal. Alternatively, you can also use your favorite editor and/or the OS Terminal (in Windows, that will be the Command Window).

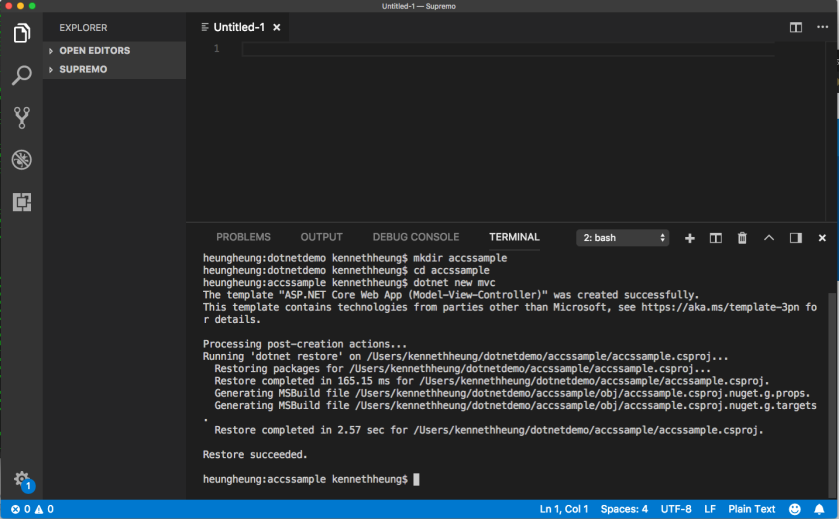
  2. Create and goto (mkdir/cd)  your desire folder and create the mvc project – I will call the project accssample:

mkdir accssample
cd accssample
dotnet new mvc

Screen Shot 2018-03-25 at 11.04.30 AM.png

  1. Open Program.cs file of the project, add .UseContextRoot( )  and .UseUrls( ) in the CreateDefaultBuilder
.UseContentRoot(Directory.GetCurrentDirectory())

.UseUrls("http://*:"+ Environment.GetEnvironmentVariable("PORT"))
Your program will looks like this
Screen Shot 2018-03-25 at 11.14.15 AM

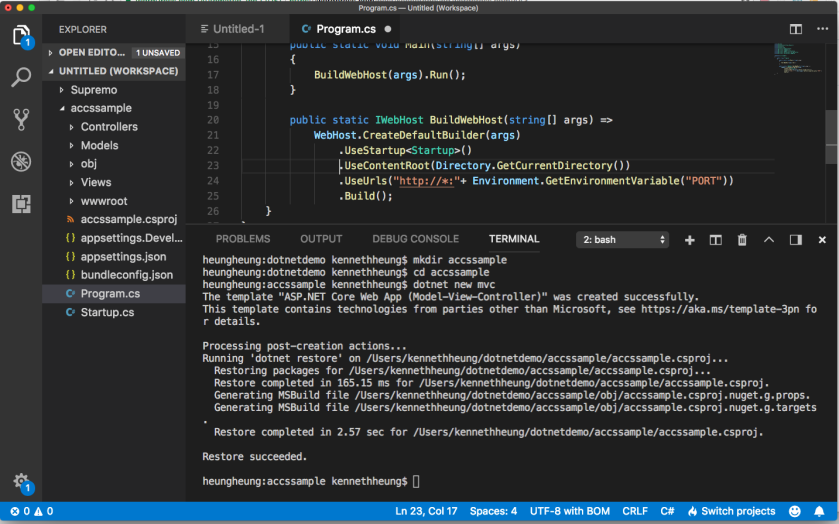
Remember to save the changes.

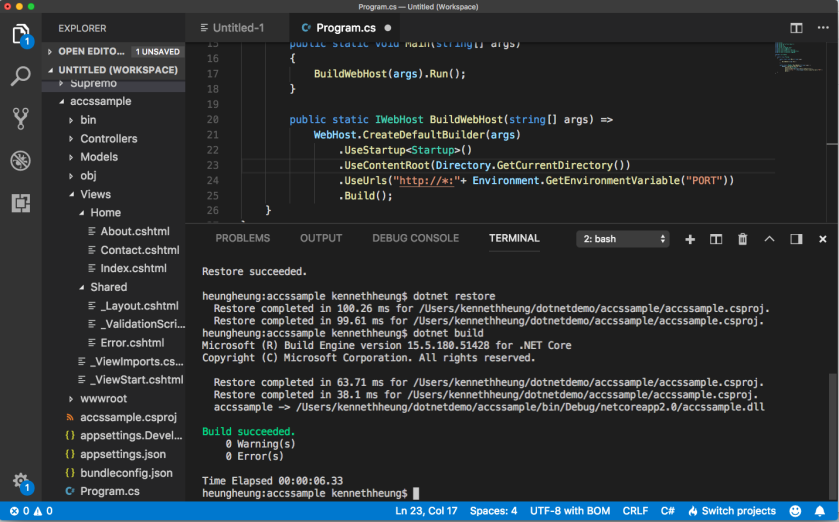
  1. Use the terminal to update the project dependencies and create a debug build for local testing.
dotnet restore
dotnet build

Screen Shot 2018-03-25 at 11.25.17 AM.png

  1. Test the program locally
export PORT=8080
dotnet run


Screen Shot 2018-03-25 at 2.07.15 PM

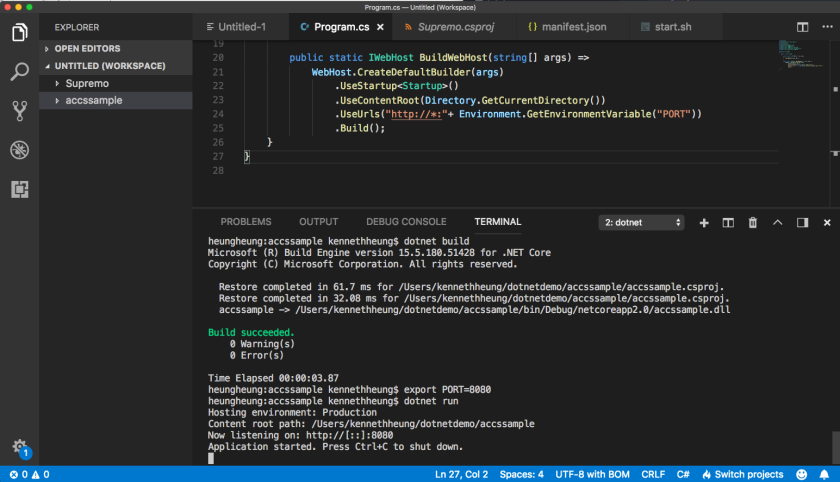
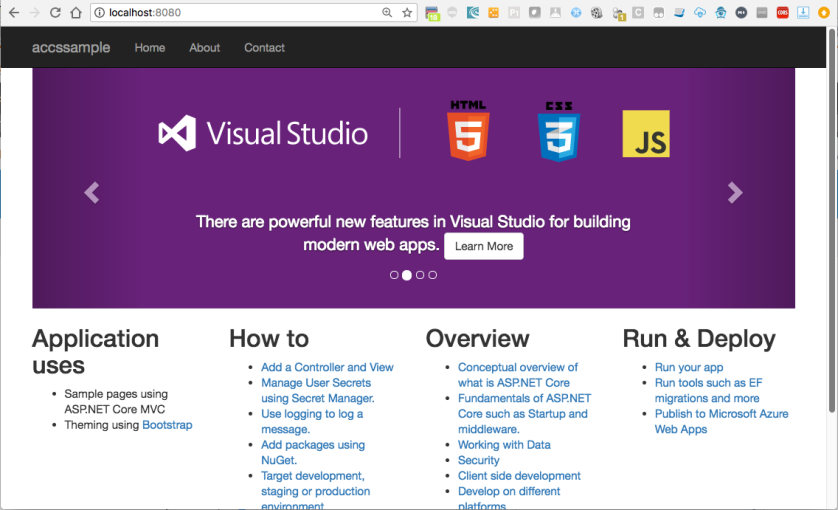
Open a browser and navigate to http://localhost:8080 to test the app locally

Screen Shot 2018-03-25 at 2.08.12 PM


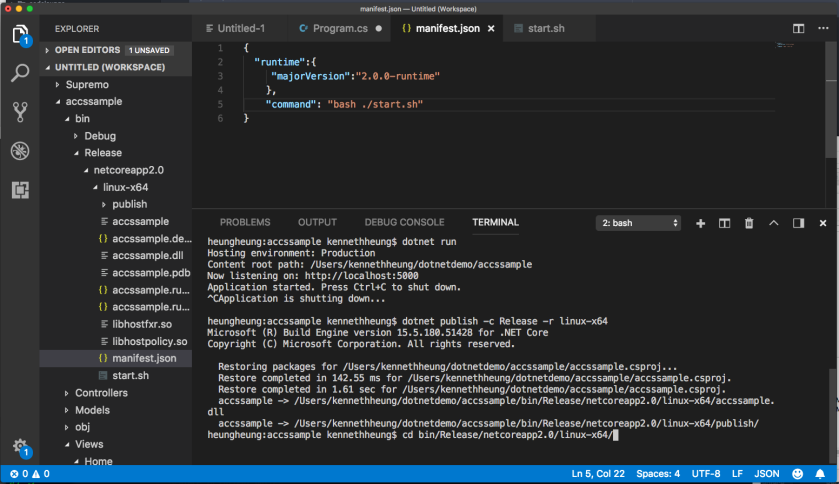
  1. Once we are happy with the app, we can create the release build. We will need to publish to Linux release for ACCS.
dotnet publish -c Release -r linux-x64

Screen Shot 2018-03-25 at 11.42.10 AM

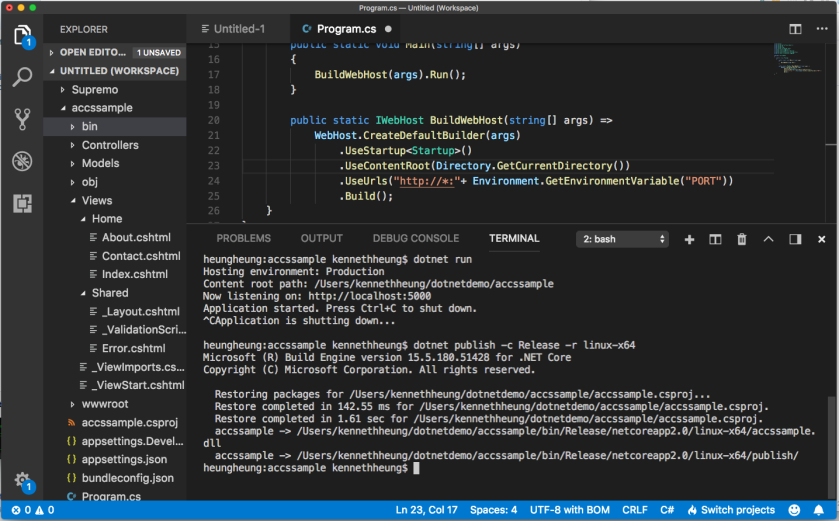
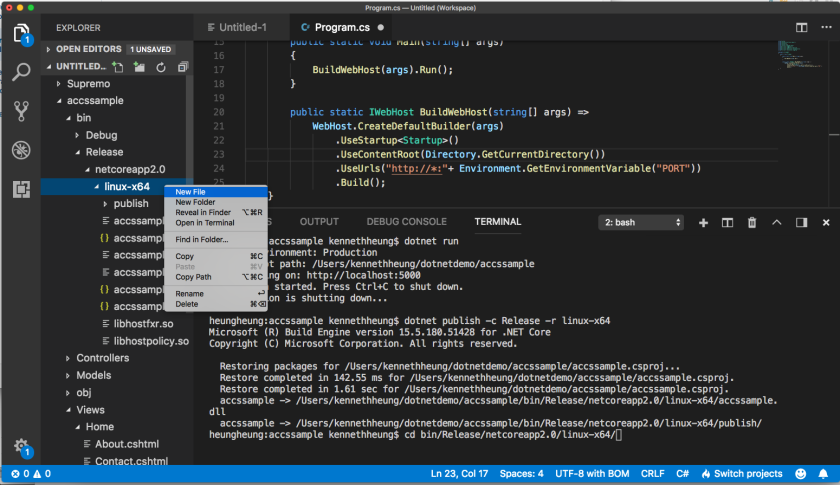
  1. For ACCS to start the program, we will create 2 more files in the distribution (i.e. linux-x64) folder
start.sh
manifest.json

Right click the linux-x64 folder and choose new file, name the first file as manifest.json

Screen Shot 2018-03-25 at 11.43.51 AM

Screen Shot 2018-03-25 at 11.44.11 AM

  1. Enter the contents of manifest and remember to save it. For more info about ACCS manifest, please refer to ACCS documentation https://docs.oracle.com/en/cloud/paas/app-container-cloud/dvcjv/creating-meta-data-files.html

Screen Shot 2018-03-25 at 11.50.31 AM

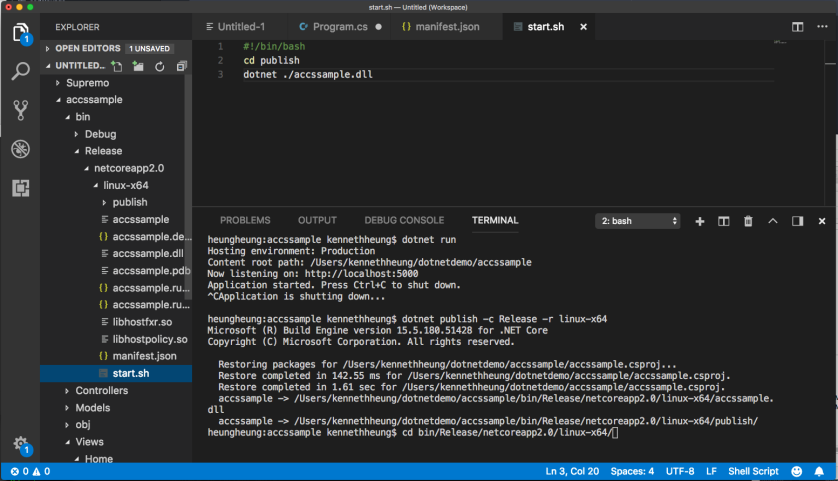
  1. Repeat the same for the start.sh

Screen Shot 2018-03-25 at 11.50.42 AM

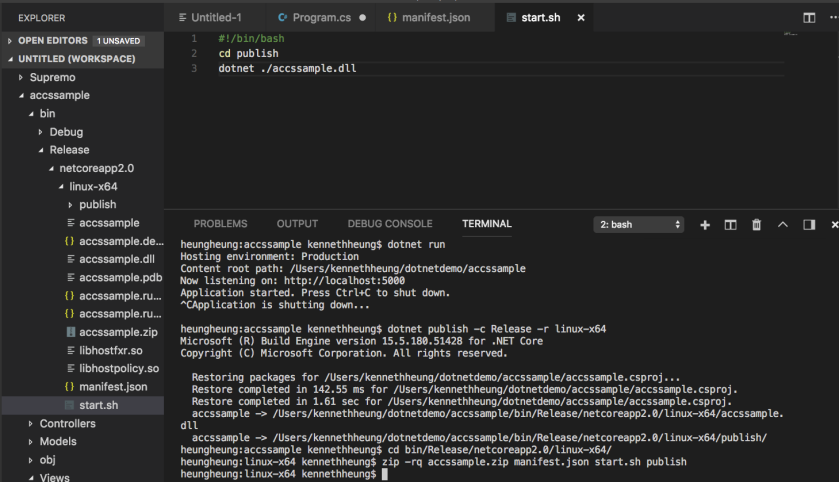
  1. In the terminal window, zip the release, start.sh and manifest.
cd bin/Release/netcoreapp2.0/linux-x64/
zip -rq accssample.zip manifest.json start.sh publish

Screen Shot 2018-03-25 at 12.01.27 PM

  1. The application is now ready to deploy to ACCS. We can either use Web GUI, CLI or REST API to deploy the app.

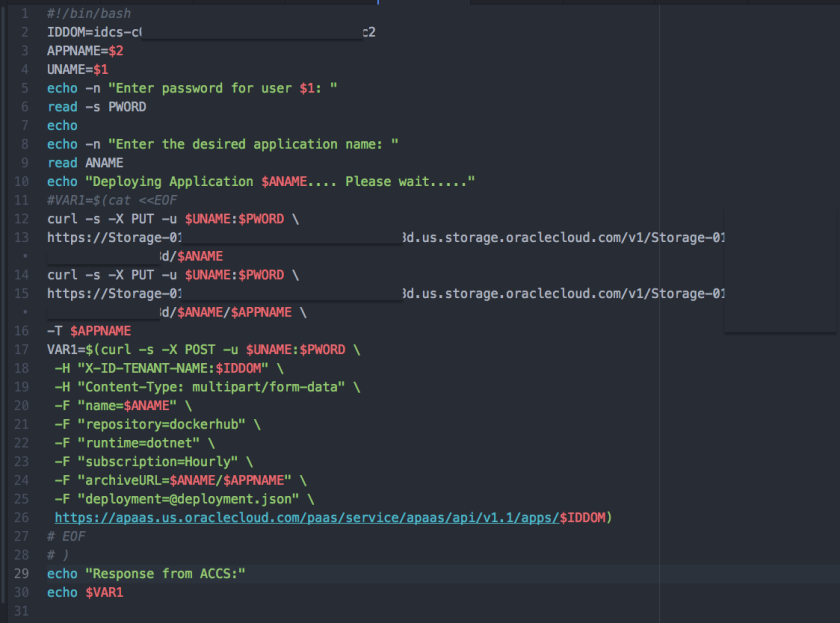
I’ve a small shell script to execute curl to send REST to deploy the app. I also have a deployment.json file to control the memory and number of instance of the app. The deployment json looks like this

{
        "memory":"1G",
        "instances":"1"
}

this is what I did to deploy the app to ACCS,


Screen Shot 2018-03-25 at 1.22.10 PM

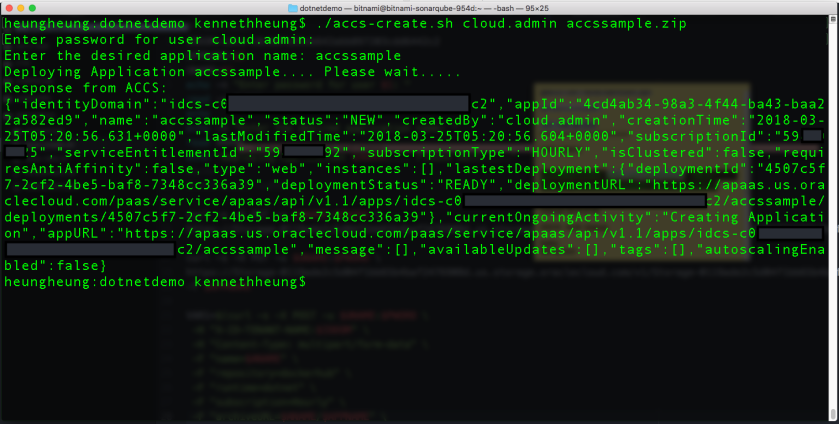
and this is what my script looks like – what I actually do is

  • create a storage container
  • put my the zip file in the container
  • create an ACCS app from zip (in storage container)

Screen Shot 2018-03-25 at 2.42.55 PM

  1. We can double check the application deployment from ACCS WebUI (or using CLI / REST API)

Screen Shot 2018-03-25 at 2.48.01 PM

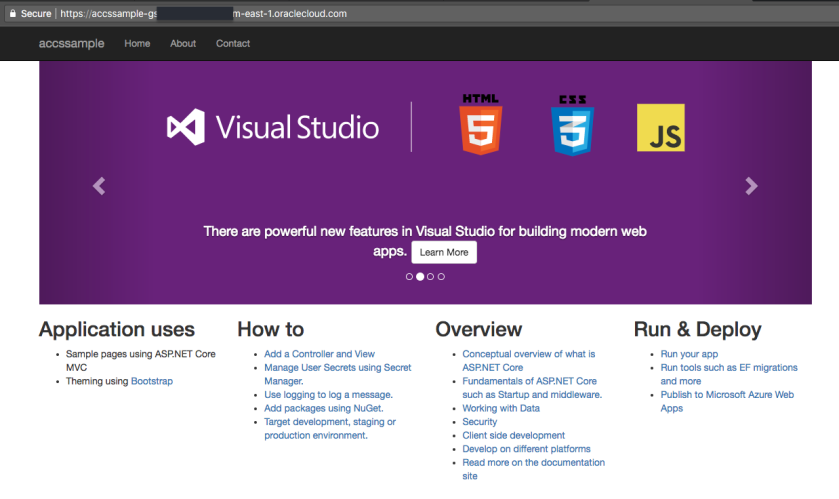
  1. Our sample app is now up and running in ACCS.

Screen Shot 2018-03-25 at 2.48.16 PM

SonarQube with Oracle Developer Cloud

Got a question from my sales colleague whether DevCS supports SonarQube. The quick answer is “yes” and I’m going to briefly describe how to do it. I’m going to create a SonarQube VM via Bitnami in OCI Classic and scan the spring-boot example during the maven build process.

Part A – SonarQube

  1. The first step is the create the SonarQube VM in OCI Classic. Just like what we’ve talk about previously, we can use the Bitnami portal to provision the VM. Login to Bitnami and navigate to the Launchpad for Oracle Cloud.

Go to the Library tab and search for SonarQube. Click the Lauch button to create the VM.

Screen Shot 2018-03-20 at 9.22.03 AM

  1. Pick the corresponding OCI Classic Cloud Account, please refer the previous post about the details of setting up Cloud Account in Bitnami. Choose the desired disk size and server size. In this example, we will use Oracle Linux as the OS of the VM. When ready, just click to Create button.

Screen Shot 2018-03-20 at 9.23.48 AM

  1. Wait for a while for your VM to get provisioned. In the provision screen, you can get the login information (username/password) of SonarQube, as well as the SSH key to access the VM.

Screen Shot 2018-03-20 at 9.49.50 AM

  1. Once SonarQube is ready, you can either
  • click the [GO TO APPLICATION] button
  • manually use a browser to navigate to http[s]://[ip-address-of-vm]

to access SonarQube (web interface).

  1. Login SonarQube with credential you got in the previous step (i.e. default username is admin)

Screen Shot 2018-03-20 at 9.52.29 AM

  1. The first time you access SonarQube, the tutorial / wizard will guide you through some initial steps. We will to create a token (for details of using SonarQube, you can visit their website).

Provide a name for the token and click [Generate]

Screen Shot 2018-03-20 at 9.50.02 AM

Copy the token value, as you will need it for your maven step. When ready, click [Continue]

Screen Shot 2018-03-20 at 9.50.14 AM

  1. It will then ask which programming language you need to scan. In our example, we will just click [Java].

Screen Shot 2018-03-20 at 9.50.41 AM

For Java, we can select whether we use maven or gradle for the build process. For our example, we will use maven.

Screen Shot 2018-03-20 at 9.50.55 AM

The required mvn command will be displayed in the right hand side (you can also copy this command for future reference). Click [Finish this tutorial]

Screen Shot 2018-03-20 at 9.51.36 AM

Part B – Developer Cloud

8.  In our build job, we will need to add sonar:sonar as part of the maven goal. We will also need to provide the sonar server url and token we got in part A. When the build executes, this maven step will post the project source code to SonarQube for code scan.

Screen Shot 2018-03-21 at 12.58.05 PM

  1. Here comes the sample (console) output of the build step – the snippet of code being scanned.

Screen Shot 2018-03-21 at 3.29.04 PM

  1. You should be able to view the scan report in SonarQube

Screen Shot 2018-03-21 at 3.32.08 PM